programming4us


Windows Server

Windows Home Server 2011 : Setting Up a Fax Server (part 2) - Sending a Fax

- Free product key for windows 10
- Free Product Key for Microsoft office 365
- Malwarebytes Premium 3.7.1 Serial Keys (LifeTime) 2019
7/16/2013 7:42:13 PM

6. Sending a Fax

To fax something to a friend or colleague (or, heck, even a total stranger), Windows Home Server gives you two ways to proceed:

  • You can fax a simple note by sending just a cover page.

  • You can fax a more complex document by sending it to the Windows Home Server fax “printer.”

Sending a Cover Page Fax

Let’s start with the simple cover page route:
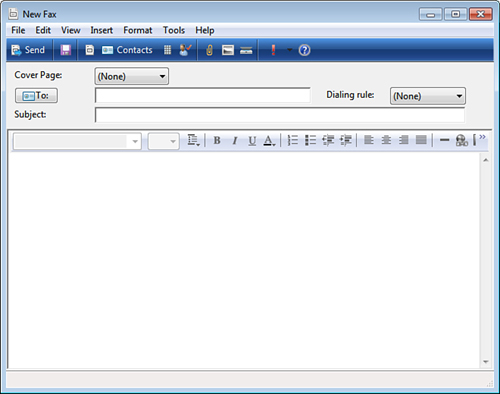
1.
In Windows Fax and Scan, either click New Fax or select File, New, Fax. The New Fax window appears, as shown in Figure 2.

Figure 2. Use the New Fax window to send a simple cover page fax.

2.
Use the Cover Page list to select the cover page you want to use. You have four default choices:

  • Confidential— This cover page includes the word Confidential, so use it for faxes that contain sensitive data.

  • FYI— This cover page includes the phrase FOR YOUR INFORMATION, so use it for faxes that don’t require a response or action.

  • Generic— This cover page does not contain special text, so it’s useful for regular fax messages.

  • Urgent— This cover page includes the word Urgent in large (52-point) type, so use it for faxes that require immediate attention or action.

3.
Use the To box to type the recipient’s fax number.

Tip

If the recipient is in your Contacts folder and you have the Fax field filled in (in either the Work or the Home tab), click To, select the recipient, click To, and then click OK. If the person’s name appears in the To box in red type, it means Fax and Scan can’t find a fax number. Double-click the recipient to open the contact properties sheet, fill in the Fax number in either the Work or Home tab, and then click OK.

4.
Type a subject for the fax.

5.
Use the large text box to type the message you want to appear on the cover page.

6.
Select Tools, Options to open the Options dialog box.

7.
Choose when you want to send the fax:

  • Now— Sends the fax right away

  • When Discount Rates Apply— Sends the fax as soon as possible after your discount rates begin

  • At This Time— Sends the fax at the time you specify use the spin box

Note

If you want to send faxes when your phone rates are discounted (such as after midnight), open the Fax Services Manager, right-click Fax (Local), and then click Properties. Display the Outbox tab, use the Discount Rate Start spin box to specify the start time for your discounted phone rates, use the Discount Rate End spin box to specify the end time for your discounted phone rates, and then click OK.

8.
In the Priority group, use the Send Fax As list to set the fax priority to High, Normal, or Low.

9.
Click OK.

10.
When you’re ready to ship the fax, click Send.

Faxing from an Application

The other (and probably more common) method of sending a fax is to send a document directly from an application. You don’t need applications with special features to do this, either. That’s because when you install the Fax Server, it adds a new printer driver to Windows Home Server. This printer driver, however, doesn’t send a document to the printer. Instead, it renders the document as a fax and sends it to your modem.

To try this, follow these steps:

1.
Create the document that you want to send.

2.
Select the program’s File, Print command to get to the Print dialog box.

3.
Select Fax as the printer, and then click Print. The New Fax window appears.

4.
Follow the steps outlined in the previous section to set the fax options. With this method, you don’t have to bother with a cover page, although you can still include one of you like.

Connecting to the Shared Fax Printer

When you configured the Fax service earlier, you shared the Windows Home Server Fax printer with the network. This means that anyone else on the network can use the Fax printer to send a fax. Here are the steps clients must follow to connect to this printer:

1.
Double-click the Shared Folders on Server icon on the desktop. (Alternatively, open Windows Explorer and navigate to the \\Server folder.)

2.
Right-click the Fax printer and click Connect.

3.
If you’re asked to confirm. Click Yes.

Windows connects to the Fax printer and adds it to your list of printers. In the Print dialog box of any local application, use the Fax on SERVER printer to fax a document.

Other -----------------
- Windows Home Server 2011 : Controlling Services (part 2) - Controlling Services at the Command Prompt, Controlling Services with a Script
- Windows Home Server 2011 : Controlling Services (part 1) - Controlling Services with the Services Snap-In
- Windows Home Server 2011 : Configuring the Microsoft Management Console (part 2) - Creating a Custom Taskpad View, Controlling Snap-Ins with Group Policies
- Windows Home Server 2011 : Configuring the Microsoft Management Console (part 1) - Adding a Snap-In
- Windows Server 2012 : Monitoring, Tuning, and Troubleshooting Hyper-V - Using VM Monitoring
- Windows Server 2012 : Monitoring, Tuning, and Troubleshooting Hyper-V - Using Perfmon for logged monitoring
- Windows Server 2012 : Monitoring, Tuning, and Troubleshooting Hyper-V - Using real-time monitoring tools
- Windows Server 2008 : Licensing and Activation - Forcing Registration of KMS Server SRV Records, Manually Creating an SRV Record for KMS
- Windows Server 2008 : Licensing and Activation - Managing Activation Tasks with slmgr
- Windows Server 2008 : Migrating Printers with printbrm, Controlling the Print Queue with prnqctl.vbs
- Windows Server 2008 : Publishing Printers to Active Directory with pubprn.vbs
- Windows Small Business Server 2011 : Deploying Network Printers (part 4) - Sharing a Printer
- Windows Small Business Server 2011 : Deploying Network Printers (part 3) - Creating a DHCP Reservation for a Printer
- Windows Small Business Server 2011 : Deploying Network Printers (part 2) - Installing a Network-Attached Printer, Installing a Network Printer Manually
- Windows Small Business Server 2011 : Deploying Network Printers (part 1) - Creating a Printer - Installing a Local Printer Manually
- Windows Small Business Server 2011 : Sharing Printers- Understanding Windows Printing
- Windows Home Server 2011 : Getting More Out of Control Panel (part 2) - Alternative Methods for Opening Control Panel Icons
- Windows Home Server 2011 : Getting More Out of Control Panel (part 1) - Understanding Control Panel Files
- Windows Home Server 2011 : Using the Local Group Policy Editor (part 3) - Increasing the Size of the Recent Documents List, Enabling the Shutdown Event Tracker
- Windows Home Server 2011 : Using the Local Group Policy Editor (part 2) - Customizing the Places Bar


Top 10
 
- Microsoft Visio 2013 : Adding Structure to Your Diagrams - Finding containers and lists in Visio (part 2) - Wireframes,Legends
- Microsoft Visio 2013 : Adding Structure to Your Diagrams - Finding containers and lists in Visio (part 1) - Swimlanes
- Microsoft Visio 2013 : Adding Structure to Your Diagrams - Formatting and sizing lists
- Microsoft Visio 2013 : Adding Structure to Your Diagrams - Adding shapes to lists
- Microsoft Visio 2013 : Adding Structure to Your Diagrams - Sizing containers
- Microsoft Access 2010 : Control Properties and Why to Use Them (part 3) - The Other Properties of a Control
- Microsoft Access 2010 : Control Properties and Why to Use Them (part 2) - The Data Properties of a Control
- Microsoft Access 2010 : Control Properties and Why to Use Them (part 1) - The Format Properties of a Control
- Microsoft Access 2010 : Form Properties and Why Should You Use Them - Working with the Properties Window
- Microsoft Visio 2013 : Using the Organization Chart Wizard with new data
- First look: Apple Watch

- 3 Tips for Maintaining Your Cell Phone Battery (part 1)

- 3 Tips for Maintaining Your Cell Phone Battery (part 2)
programming4us programming4us